
The topic of spam is a perennial one so we decided to prepare a more in-depth article to increase your understanding of the issue – and give you concrete steps on how to prevent or fix it.
This subject is especially timely because Google and Yahoo announced that by February 2024 all bulk senders (that means over 5.000 emails per day) will need to have DMARC implemented. Otherwise, the emails will simply not be delivered to inboxes managed by these two major companies. This also includes emails sent on your behalf by a third party (e.g. Mailchimp.)
It’s everywhere. Spam.
You will always find new messages in the spam folder, whether it’s fraudulent offers or advertising to buy a service you certainly don’t need. Any mail you did not request could be considered spam. We could easily compare spam to advertising and discount flyers in the mailbox.

The term SPAM itself comes from a skit by a British satirist troupe Monty Python, in which innkeepers offer meals – “spam” being the main ingredient in all of them.

There are hundreds of factors that influence whether the email ends up in the SPAM folder or not. The most common ones include:
- Basic infrastructure settings
- Reputation verification (SPF, DKIM, DMARC)
- The reputation of IP addresses of servers sending mail (eg 212.45.5.60)
- The reputation of the sender’s domain (e.g. your-company.com)
- User reputation (ie, whether the user sends a lot of messages that are marked as spam)
- And many others.
How email works
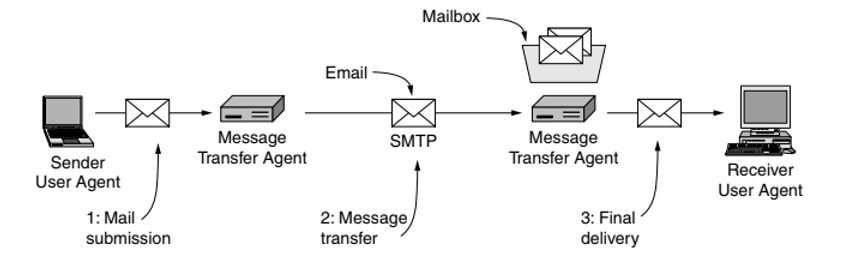
For a better understanding of the issue, we will first briefly describe how e-mail works.
The model for sending an e-mail is regular mail, where you put the paper with the text on it into an envelope. The envelope contains all important delivery information such as address, zip code, delivery priority, and other information.
Electronic mail is very similar in this regard. An e-mail consists of a header (so-called “envelope”) and the message itself. You can view the header in Gmail for each message by clicking the three dots and selecting Show Original.

At the beginning, the sender writes the text of the e-mail and adds recipients in his e-mail program, e.g. Gmail (MUA, Mail User Agent). Gmail is also an e-mail server (MSA, Mail Submission Agent) that checks for errors and moves it to the same server for distribution (MTA, Mail Transfer Agent). SMTP (Simple Mail Transfer Protocol) is used for sending (=delivering the e-mail to the recipient). At the time of design, the protocol was able to deliver a message directly to the recipient’s server, but that was at a time when there were not so many devices in the global Internet network.
Based on the address of the target user, the MTA determines where to forward the e-mail. It is oriented according to the domain part of the e-mail address and typically according to the MX records in the DNS of the recipient’s domain. E-mail is sent successively between MTA servers until it reaches its destination. When the email is delivered to the destination computer (to the user’s mailbox), it is passed from the MTA to the MDA (Mail Delivery Agent), which adds the email to the user’s email inbox (for example Gmail again).
Basically, the SMTP protocol has no authentication, and the e-mail is sent in readable ASCII form (attachments are then encoded using base64 for transmission). Simply put, this allows anyone to send an email from any email address (and pretend to be someone else). For spammers, you just need to connect your SMTP server to the Internet or find a free server (so-called Open Mail Relay), connect to it remotely, and send commands that aim to make the e-mail look like it is sent under your domain and send it.
How to properly set up Google Workspace
As we have proven, it is not so difficult to send e-mails under a foreign domain. If this happens, your domain may be identified as a spam domain. Then even your emails from Gmail can be marked as spam by the recipients.
How to prevent your e-mails from falling into spam and ensuring they are really from you? There is a so-called “holy” trinity of settings that will help you with this.
Step 1: SPF
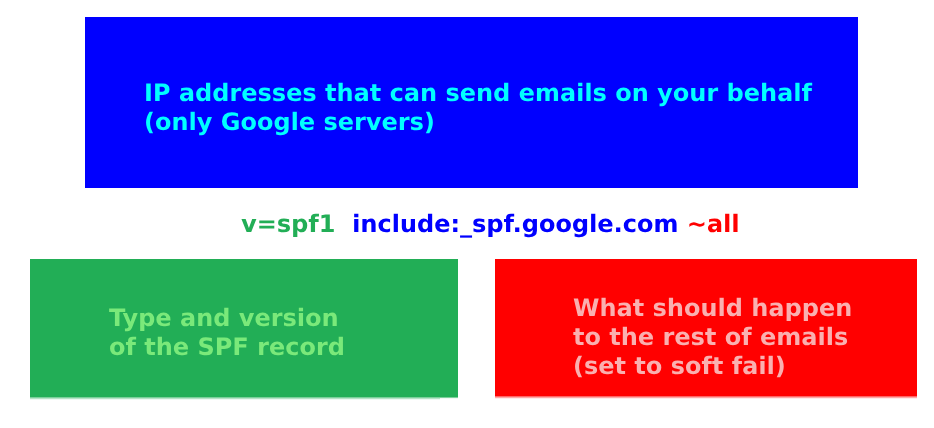
One of the first settings is the so-called SPF record (Sender Policy Framework). This describes which email servers are allowed to send emails from your domain. It is set as a TXT record in DNS. The IP address or Internet address of the server is entered in the record. There should only be one SPF record at a time. So if you already have one in DNS, edit the existing one instead of adding it. Activation and promotion can take up to 24 hours (depending on the setting of the so-called TTL parameter ).
The record is interpreted from left to right. For Gmail, we recommend setting it as follows:
Attention! SPF record must be kept valid! There are several mistakes you can make. The most common include:
- you have more than 1 SPF record
- you have too many nested calls (max. allowed is 10)
- you don’t have the right tool listed
- if you use subdomains for different services, you need to have the SPF record correct for the subdomains as well
- if you use other email services (e.g. Mailchimp, CRM, another email server, smart printer, scanner), all other sources must be entered
You can test the correctness of the settings using available online tools (e.g. DMARCIAN SPF Record Check ) or go directly to Google.
There is one more “tricky” thing to mention about the SPF record. According to the standard, it is verified on the so-called return-path address, which can be a different address than the one listed in “From:”. If you were to rely only on the SPF protection of your domain, it is unfortunately not enough, attackers would only need to set up SPF on any domain and use it in the so-called return-path address to bypass this check.
Step 2: DKIM
Another level of security is DKIM (A Domain Keys Identified Mail).
Every email sent is digitally signed with your private encryption key. The principle is as follows: when sending, selected parts of the message are taken, a checksum is calculated from them, and this sum (the so-called hash) is signed (encrypted) with your private key. The code encrypted in this way is added to the header of every e-mail sent.
The incoming server downloads the public key from the DNS record (determined by the domain of the DKIM signature), which it uses to decrypt your signature (and thus obtain the original hash). It calculates its checksum from the content of the message in the same way and then compares whether it is the same as the one that came in the DKIM header. If they match, it is certain that those parts of the message that were used to calculate the hash code have not changed during the journey.
The DKIM signature is an extremely important factor in evaluating reputation, because it is directly linked to your domain and much harder to exploit.
You set up DKIM from the Google Admin console, where Google prepares this public key for you, which you then insert into the DNS record as a TXT. You can find detailed instructions in the Google Admin tool Help, or you can contact us.

Again, a small trick of DKIM is that any domain can be specified in the key domain (d= parameter), so a potential attacker can send an email from your domain, but sign it with his key – from the point of view of the DKIM standard, such a message will be considered authentic.
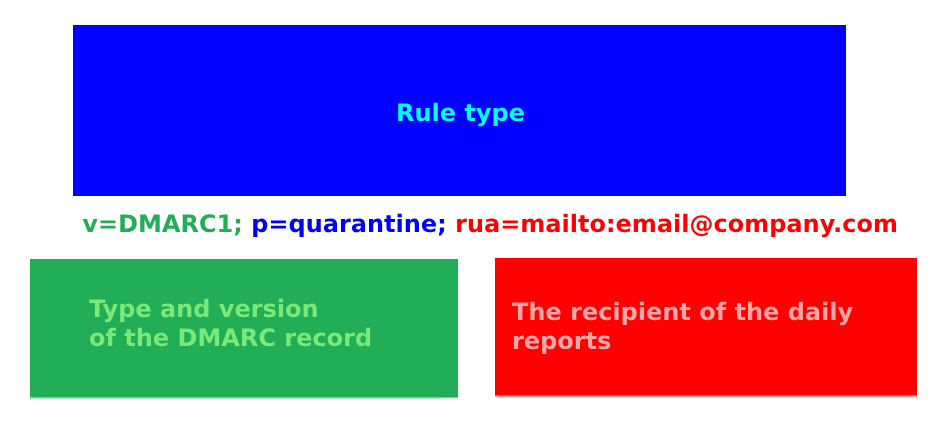
Step 3: DMARC
The last step is setting the so-called DMARC (Domain-based Message Authentication, Reporting & Conformance). It is a technical specification for reducing the abuse of email servers. It helps mail senders (that’s you!) to determine how receiving servers should behave with e-mails that do not meet the SPF or DKIM protection of your domain. As a reminder: SPF tells which server IP addresses can send a message for a given domain (in our case, Google, or other external services). DKIM confirms that the email content is trustworthy and has not been modified during delivery. DMARC then uses the data obtained and summarizes what should happen to the message if it is in any way suspicious. For a message to comply with DMARC rules, there must be either a domain match in the SPF record or in DKIM (one of them is enough).
In practice, this is one of the most valuable tools, as it allows you to control what happens to emails that you haven’t sent, and you also get reports on what recipients think about your domain (i.e. how many emails you deliver and how they conform to DMARC standards). In addition, DMARC is the only standard that is tied directly to the From: domain – and thus is technically the only tool that can really ensure the protection of your domain.
The DMARC record is again set as a TXT record in the DNS record. Mandatory settings include record type (v) and then policy settings (p).
- p=none – only reporting, no delivery restrictions
- p=quarantine – if the message does not comply, it will be delivered to SPAM
- p=reject – if the message does not comply, it will be rejected
We also recommend setting up an e-mail to which daily reports (rua) will be sent. You can also use a Google Group as an e-mail with sending messages from recipients outside the domain enabled. There are a number of services that can visualize them so that you can get the most out of them.
When setting up DMARC, however, we recommend starting with sp=none and first checking if you have everything set up correctly – because if you started at a higher level of protection and didn’t have SPF and DKIM records set up correctly for all your e-mail channels, you could paradoxically harm yourself ( as some of your email communications would not be delivered).
Conclusion
These three settings (SPF, DKIM, and DMARC) will effectively help you protect your domain and the effect should be seen within a few weeks.
If you need help with the setup and you don’t want to risk errors that may affect the deliverability of e-mails, contact us at support@signaturesatori.com.